Fryerstown Fourth Birthday Frock


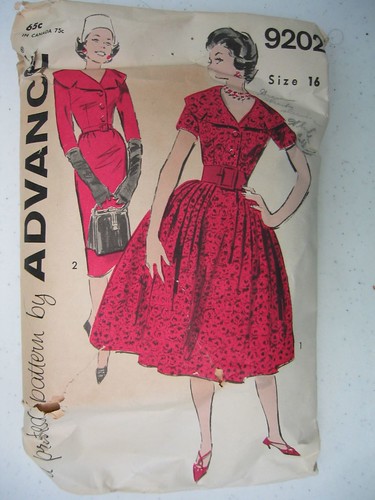
I went to Fryerstown Antique Fair on the weekend (near Castlemaine, in Victoria, Australia) and gots me a pattern.


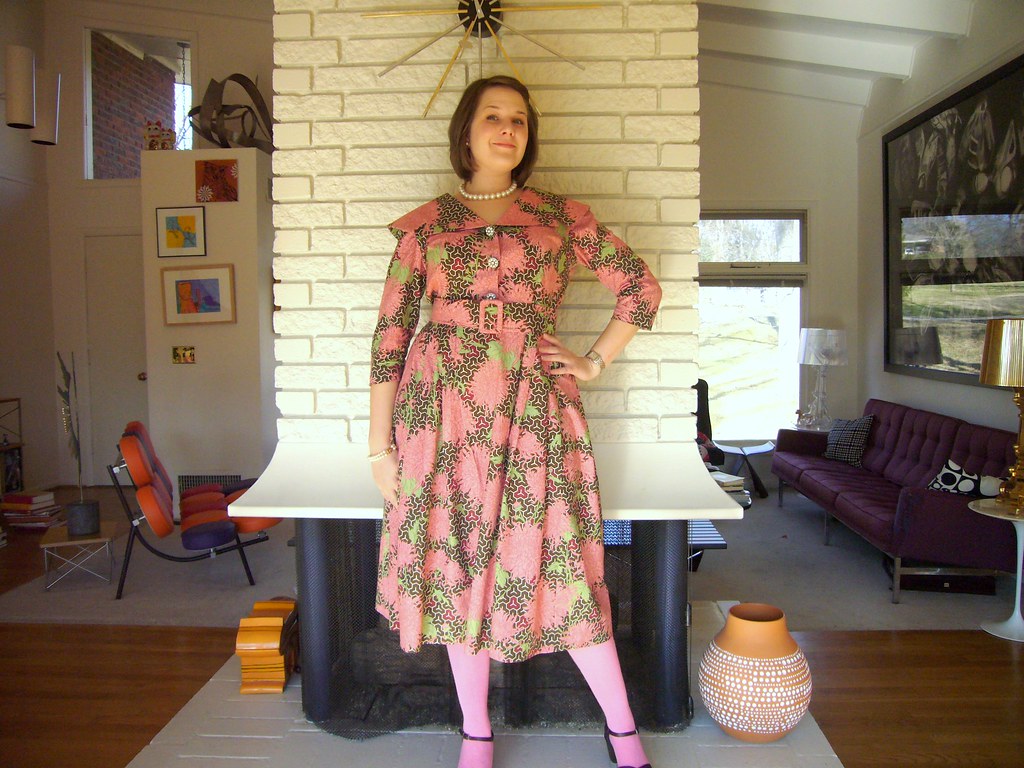
From the pattern I made me a frock. Fabric is from Spotlight, and since I didn't buy enough (grrr), I cut the collar and hem from an old pair of linen trousers that had a hole courtesy of my bike. The buttons are old vegetable ivory. I like it. I feel like I'm wearing a giant version (sans lace, ribbon, and pinkness) that I might have been dressed in for my 4th birthday party. Which is quite fitting since my seamster mother made me some quite fabulous clothes when I was a wee thing.


I also picked up this cool little skirt marking device that places a line of chalk - poof! - as you squeeze the rubber bulb and spin around in front of it. So ingenious.


Incidentally, following on from my early question about what's a good soundtrack for sewing retro, I thought I'd post what I was listening to as I finished this one up. It's one of my very favourite genres of bad LP - the stereo demonstration album. The sort of thing you'd put on to show off your speakers when you'd finally ditched your mono system. Ooooh, listen... strings in the left speaker! Cymbals in the right! Courtesy of muzak-ed pop songs! So good.

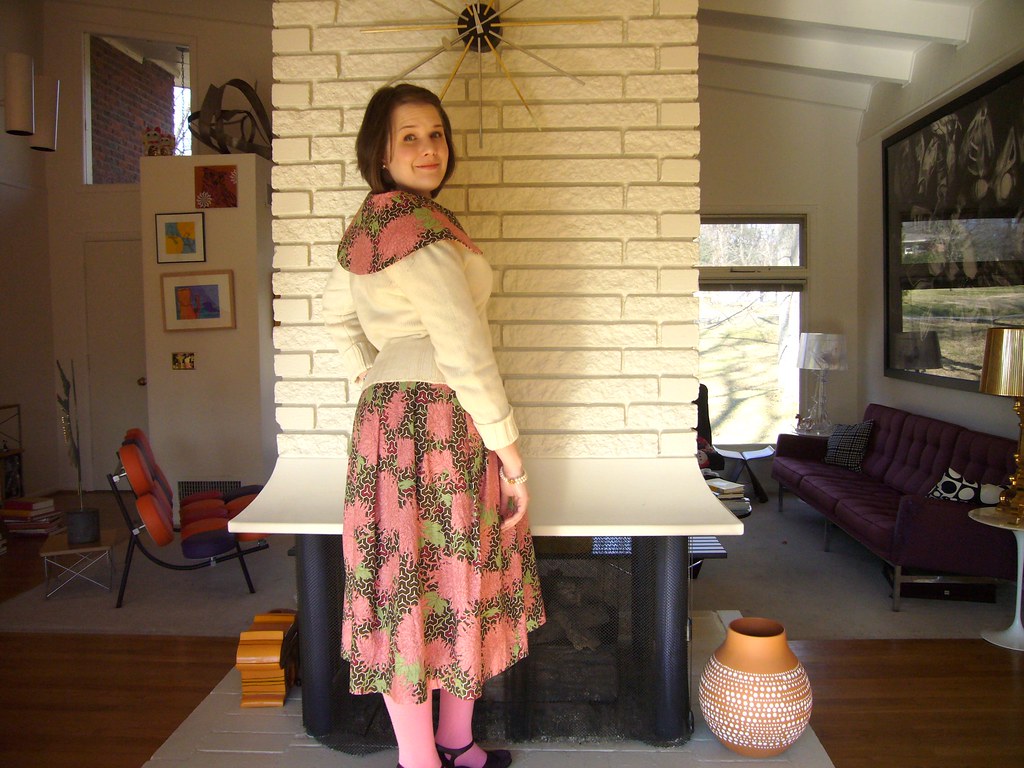
OH! And I meant to say. This pattern nearly killed me. I like to think of myself as reasonably competent with the sewing and the dressmaking. But. A combination of the most awkward and clunky English in the instructions and an unprinted pattern riddled with perforations, only some of which actually corresponded to points that required marking and matching, meant that I made countless mistakes and actually cut the skirt out upside down. Too bad, I told the pattern, it's going on upside down and no one will know.

Except if I post it on the internet. Ooops.

Pittsburghin'

Calling out to my western Pennsylvania compatriots! I will be heading to Pittsburgh this weekend. Are there any local fabric shops or vintage clothing stores worth checking out?

Glad to be back

Hi eveyone :) I havent posted in such a long time but have been a busy lil bee, I started college in september to do a foundation in Art & Design (spec. Fashion & Textiles) and am now finding time to sew again finally! However I was wondering if any of you lovely people could recommend an easy hat pattern to tackle, I have a thing for accessories at the moment lol - thanks!

I'm New Here

Hello! I'm Juliane, also known as Retro Grace, and I blog about sewing and smocking and other things, too. I especially enjoy collecting and sewing with vintage patterns, and my collection seems to grow and grow....

I particularly love vintage children's patterns. This one is Simplicity 1149 that I made for my granddaughter:


I name all the little dresses I make, and I call this one Bubblegum. I adore it.


I love the sash:


The back detail:


I'm happy to join all of you here!

"Have Belt Made"


Having been a slave to the shift dress for so long, I recently decided I wanted a comfortable cotton shirtwaist. So I sewed up a pattern in my stash that had long been ignored - Simplicity 5877. The pattern is from 1965, and is very Ladies Auxiliary, very Junior League, and I love it. It does need a belt, and will have one, if I can figure out how to make a matching one. The pattern instructions said to "have belt made or wear with purchased belt." I'd love to know where I can go in this day and age to get a belt made for a shirtwaist.


Hello


Hi Everyone! New here! Its so great to see all the vintage patterns being used - and the stories behind them! Ive always loved vintage and period clothing. It tells us so much about how life was before mass consumerism! (Not that I dont shop for clothes on the cheap myself, but I appreciate so much more the silhouettes and craftsmanship of days gone by)

This is a dress I made a while back from an old Butterick pattern. I wear it a lot and it saved me last summer on a hot New Jersey vacation day! The fabric is cotton with a"retro" print. I think it would make up better in a nice rayon and maybe I'll make a little black dress with it one of these days.........

I mainly make custom clothing for others, so I dont often get to sew for myself anymore. I collect vintage patterns and have a little line of tribal/fusion belly dance clothing!

Cheers!
Kathleen

Introduction

My no more buts project turned out to be finally starting my own sewing blog (and knitting and whatever else comes along). 
My mom taught me the basics so I have been sewing since I was a kid. But I never really started honing my craft until recently. For the longest time I was content with p.j. bottoms, skirts, and other easy projects. As I've grown older, I've become less and less tolerant of ready to wear: the fit, the quality (or lack there of) and the fashions just seem to get worse and worse! Not to mention, I would like my own personal style to be something more unique and fun that what is available at the local mall. I spend a lot of time reading, and trying to perfect my sewing technique. And honestly, much of the time I still feel like a beginner!
I love all things vintage and retro. It all started with my "discovery" of classic films when I was in Jr. High and it all sort of snowballed from there. Mid-Century is my favorite era, but as far as beautiful clothing goes - I'm a sucker for any decade. 
My most recent project was a vintage inspired sundress. The fabric and pattern are new, but I think the silhouette has a nice 50's flavor. More photos and details at my blog moxietonic.blogspot.com

Sew Glad to Be here

Hello Sewers -- Pamie G. here -- I have been sewing for about 6-7 years, started a little later than most (age 40) and love retro -- I am just beginning to collect vintage patterns and love everything I can get my hands on about sewing, felting, and I just learned to knit two days ago. I love Retro embroidery designs as well and just love life and appreciate my new sewing friends! Happy Sewing! Pamie G.

http://www.sewwithme2.blogspot.com/

No More Buts (Oct-Jan project)

This did not start as my 'No More Buts' project. I have a vintage muumuu pattern (the kind with a draped/train back) that I don't have quite enough fabric for and will have to redraft the pattern for using a different fabric in the pleat that I wanted to be my project. But I digress.


There were several factors leading to this becoming the October - January project.

When I started to pull the pattern out of the envelope, it was crumbling before my eyes. The previous seamstress totally just shoved the pattern back into the envelope all wadded up, not even folded! What I believed would be a fairly straightforward project taking a couple afternoons soon turned into several hours of tracing a disintegrating pattern before I could even start.

The next problem I encountered was with my fabric. It's a lovely piece I bought on sale last year from an online retailer. I laid it on the cutting table and started to put the pattern pieces down, and quickly realized it was a DIRECTIONAL PRINT! I was cutting it seriously close with the yardage, since the website did not say it was a directional print and I didn't buy extra fabric. My general rule is to buy 5 yards of fabric if I don't know what I'm making it with it, so I always have enough for a full skirt. For this pattern to work, especially since I wanted to make the longer sleeved version with full skirt I would need about 1/2 yard more fabric than I had. Oops! So there was some cunning layout work to do.

After getting everything cut out, I thought it would be smooth sewing. First, I've never made a notched collar, and when cutting out the pattern I just followed what had been cut by the previous sewer - the notch line. It wasn't until I got to that part of the sewing instructions that I realized I was supposed to cut that line after sewing around the notch. Ugh. After trying to make it work, I eventually had to cut a new collar from the scraps. At least I had enough fabric! Then, when trying to sew it all together the top and bottom would not match, no matter what I tried. I sewed it 3 times! Fearing I traced the pieces wrong, I got the crumbled bits back out and compared. I had done a perfect tracing job. ??? Then I noticed the very faded word 'Ease' that I had missed the first time. Whew! So I eased the right places and it fit together perfectly.

The final problem I encountered was with the back zipper. Despite meticulous basting it took two tries to get it in straight. Then, because I used an invisible zipper, the plastic-ness and the placement of it caused the fabric to bow out in the back. I looked like I had a weird tumor growing. My mom suggested I take it out and just sew up the back seam since there was plenty of room with the buttons in the front to pull it over my head. That worked brilliantly.

I also realized while sewing that this is only the second time I've had to set in a sleeve on a garment. The pattern had good instructions, so it was pretty easy peasy.

So here I am, in the finished dress!


I love the collar so much, and how huge it is in the back! I think it looks cute with a sweater, too. Always a plus when you pretty much only sew cotton dresses to wear year round.


A close-up of the vintage rhinestone buttons I used. I tend to wear day dresses in the evening, so a little sparkle makes it feel more special.

Vintage vogue suit!

Hi all! I made this little suit over the weekend from Vintage Vogue 9684. Its a light brown tweedy plaid, which I wear with brown croc (mock!) pumps. I have a lot of big meetings and business travel this January and February, so it will get a lot of wear. See my blog for details on construction.

-Notamermaid

Sew Music

I've been doing some very productive sewing to a Tom Waits soundtrack lately and was curious to know what is your optimum sewing soundtrack? Soothing so you don't do anything rash? Frenetic to match the pulse of the needle and feed dog of your machine?

A Frock For Xmas Dinner!

I can't remember which challenge suggested we try something we'd been putting off...

I was given a huge stash of Vintage Patterns recently and was determined to get started on something from this stash - a frock for Xmas seemed the perfect opportunity!


Luckily Xmas wasn't too chilly in London, I wore a bolero and felt warm enough.The pattern was quite easy although I did have to go to town on my dress form - the sizes on the pattern sleeve, although almost matching my own, somehow got lost in the translation. I pinned the dress to the form and cut away a lot of excess - I probably could have gone even more 'svelte' but I did want room for turkey and xmas pud.


I don't have a huge pointy bust, which I think would be an asset with this little number, so I dug out my most Madonna-like underwear - still the front gaped a little. Then I came across the instructions for sewing in two lengths of elastic under the armholes that reach round the back and fasten like a bra - strap. What the?
I did as instructed and lo! the gaping vanished and the neckline lay flat. The only disadvantage being you need another pair of hands to get you into the dress and fasten the elastic..


Swing by my blog for more of the same - Happy 2008 to y'all!

Shari Dress, Front view


Shari Dress, Front view, originally uploaded by scarlettquilts.

I thought I had posted this but found out I put it on another blog----yikes! So I deleted that entry and am now tardy in posting this dress. I am posting it here because although it is not a vintage dress, it does have a 40's feel to it.

It is Burda 7951, the Shari dress. You can download the pattern at Burdastyle.com or order it at patternreview or pick it up at Joann's.

This is the largest size, 48. It is made of red corduroy and a blue polyester remnant I bought at Joann's. The majority was sewn on a Janome MC90000. What was especially helpful was the piping foot I ordered from Sears (don't tell my Janome dealer). If only I had that foot when I made the piping. It worked better than my zipper foot for the invisible zipper too.

I took up the hem using the dress form and it turned out better than if I just measured from the bottom. I sewed a blind hem using the Singer Rocketeer and it did a dandy job but I think I will need to take it in for a good oiling and adjustment. It sews a great sttich but I had a hard time adjusting to the foot pedal it uses and the feed dogs are not as elaborate as my Janome's so I had to "steer" more than I was used to.

Singer Rocketeer (501A)


Singer Rocketeer (501A), originally uploaded by scarlettquilts.

I love this machine. I bought it at a church rummage sale for $15. It had been sitting for a long time and served to save me when my Janome decided to take a bite out of its bobbin race. These old Singers last forever. The only thing I don't like about it is the foot control.

Stay tuned, I'll show you what it helped me finish--(actually it will post above this entry).

Butterick 3405 John Kloss Nightgown pattern

Butterick 3405, c. 1970s, Pattern Review
A John Kloss design for nightgown, or babydoll (for stretch knits only) and robe. The gown has high fitted and tied bodice, scoop neckline and flared skirt. The robe has fitted bodice with released pleats, standing collar, front button and loop closing, and full length sleeves.

I've always been attracted to the line drawings of the 70's Butterick designer patterns from John Kloss but never actually sewed one. That changed the other day when I tested the pattern by sewing the short nightie out of a hot pink cotton knit.

Super cute and super easy! Two hours start to finish, including cutting out the pattern and taking the photograph.

The skirt consists of four flared pieces and is attached to the self-lined bodice leaving a 2 inch opening at the center front. The bodice ties in front leaving a small keyhole opening between the bodice and the skirt. The pattern instructions call for slipstitching the inner bodice facing to the upper edge of the skirt, but I topstitched it in place.

Because my serger is still broken I hemmed the bottom edge - (which is a whopping 140 inches) - with a decorative overcast stitch on my sewing machine. I allowed the knit to stretch slightly which resulted in a rippled edge - similar to a lettuce hem.

It turned out cute and once the temperatures climb out of the below freezing range I'll consider wearing it!

New Here!

Hello everyone and Happy New Year!
My name is Laura. I'm 22 years old and been sewing since I was a little girl, mostly for 4-H projects. I haven't done any serious sewing for a few years since I've been in school and not had a lot of free time for sewing.
My grandma, aunts, and my mother left a huge stash of vintage sewing patterns (1950s-70s) in the attic of my house, which I've always thought were fun to look at, but I was never actually brave enough to attempt one!


It's a new year, and one of my goals is to start sewing again, so here we go! I'm going to make some shirts from some of my mom's patterns from the 70s. (she said they were easy to make) I purchased some corduroy on sale at JoAnn Fabrics that I thought would be appropriate for this style of shirt. Right now, I'm just not sure which shirt I want to make with which fabric. Any input would be appreciated! :)

The Collection - Gioia Diliberto

I was very kindly sent this book to review by the Publisher far too long ago. I read it right away and what with everything else that has been going on around here I've just never managed to type up the review!


The book is set in Paris in the workrooms of Chanel and traces the story of Isabelle Vartlet who is a seamstress there. It gives you a ton of information and a real feel for what it might have been like to sew for Chanel and other designers of the period and the descriptions of the clothing are wonderful.

I have to say that Isabelle was a bit annoying and not very interesting. It was where she went and what she saw that kept me turning the pages rather than what she thought or felt about it. It is pretty improbable that she would have walked into the job she did with the experience that she had but it was wonderful to read about the system of sewing, the customers and Chanel herself.

I have to admit that I knew very little of the period and I'm not a disciple of haute couture, but this book was a good place to start learning (it has a bibliography of factual books) and I really enjoyed reading it.

The book did the rounds of bloggers a few months back now so I will leave my review short and sweet. If you're interested in what it might have been like to sew for Chanel then pick it up, I know I will be reading more about her and the sewing rooms in the future after reading this.

Newbie Greeting

Greetings Sew Retro group. My name is Christy and I am Mary's blog friend. (I love these moments in life -- I just got my e-mail from Anna inviting me to join the group and lo and behold, I get to post my greeting right after Mary.)

By way of introduction, I having been sewing and crafting off and on since I was about 10 years old. I am the child of a mother who made all of my clothes from birth to 13 years old, when I took over. I have recently dusted off my serger and sewing machine in response to my disgust with retail (nothing fits me right). In my former life (about 5 years ago), I lived in vintage clothing (and spent a fortune in vintage clothings stores and Ebay) from the 40's to the 70's. Once I grew out of them, the party was pretty much over. The only thing remaining is a bag, a couple of sweaters and the jewelry. But, being me, I replaced those clothes -- with vintage and retro patterns. I have a milk crate full of vintage patterns and just need some incentive to get to work. Thanks to Mary, the games have begun (well, kind of. I'm a scattered thinker. Instead of starting the dress, I made a friend a messenger bag out of a Eames era home dec fabric and cut another one out of giraffe print minky. Oh yeah, and the boxer shorts that I cut out for my husband out of skull fabric. But tonight, for sure, I'm tissue fitting this bad boy.) This site has been so inspiring to me that I had to seek membership.

I am so happy to be here. You can find me at http://beezekneesfashions.blogspot.com/ when I'm not posting at Sew Retro. Happy Sewing New Year!!

Intro and a Challenge

Greetings fellow Vintage Sewists!

I'm Mary from Lebanon, Oregon, longtime sewist recently come back to sewing clothes for myself. One of my New Year's goals is to sew a wardrobe for myself from Vintage or Vintage-inspired patterns, and this dress is to be the first:


A blog-friend, Christy, and I were having a discussion some weeks ago and challenged each other to sew up S3673 in the month of January. Anyone want to join us?

I have my version all cut out in a very light teal wool that I'll line with black silk. I interfaced the whole piece with very thin iron-on interfacing before cutting, as the wool was rather limp, and I hope it isn't going to be too stiff. Next up will be a pair of wide-legged pants ala Marlene from some fab charcoal wool.

Warm and Snuggly


The robe I wear in the winter for the past couple of years has been a hot pink polar fleece monstrosity that was given to me. Perfectly functional, but hot pink isn't really my color. Before that, it was a fire engine red one, with puppy dogs, also a gift.

So when I came across a couple of really cool vintage patterns for maxi-length robes, which to me look a lot more elegant than the average bathrobe, I thought it was the perfect solution. I decided to try this one out using a couple of polar fleece blankets I bought at Walgreens instead of buying actual fleece yardage (which was more expensive). There wasn't quite enough material in the blankets to make the long sleeves shown on the pattern envelope, which was okay with me, since cooking eggs, hot burners, and sweeping synthetic sleeves don't exactly mix well, especially when you add in the "blurry eyed and sleepy" factor.

My favorite part by far of this robe is the trim, pictured here in it's full, up-close awesomeness. It reminds me of some footie pajamas I had when I was a kid.

The pattern went together very easily and quickly, although it was apparently designed for a woman approximately 5 feet, 9 inches tall. I had to cut off six inches to get it to the right length for me, and I usually only have to cut two inches off of patterns.