Showing posts with label recycle. Show all posts

Vintage bedlinens re-purposed...

A couple of weeks back I re-purposed these vintage bedlinens to make some toddler orientated stock for a craft stall at our Pre - School's Summer Fete. From this....

 To this...

Vintage 1974

On a recent shopping trip to Savers (super cool op-shop!), I bought this sewing pattern, Style 4589, dated 1974, and a floral print tablecloth ... the result was a very fast, very easy, floral summer dress :)
There's more info on my blog here
... Linda

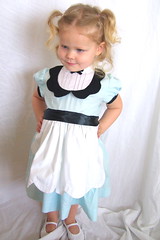
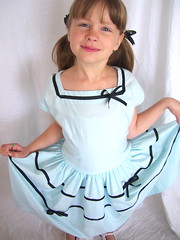
1950s Easter dresses for two very darling girls!

In spite of not starting these until the Tuesday before Easter, I finished these frocks with enough time to do a photoshoot and Easter isn't until tomorrow! Of course getting a decent picture of two very active girls is a bit of a trick...
With Amy (little one's) dress, I decided to leave the scalloped apron unadorned. What with the waist tie (I cheated and used a ribbon) and the little bow at the collar and the contrast and the topstitching on the pintucked yoke, I felt like there was enough happening on the front of her dress!
Oh, and a word to the wise - if you decide to make a dress like this, don't use Kona cotton for the apron. Two layers of Kona, gathered, at the waist was right bulky! I was so afraid I was going to break a serger needle on it!

Betsy's dress is a dropped waist style which works well if you have a girl like mine with a looong torso. She still fits into her thrift shop crinoline slip from last year - that was one less thing I had to do!
The ribbon trim was my favorite part. I sew ribbons on everything.

I am so pleased with how these turned out; I hope the girls don't outgrow them anytime soon! Then again, the sky blue material was re-purposed from a bed sheet so they didn't really cost us anything.

Advice please!

How do I turn my old prom dress in to a fabulous retro dress? All ideas are welcome! I'd like to shorten it and since it's made out of red duponi silk I could easily find more of the fabric should it be needed. So do I go with a full skirt? Or a sheath dress? Or something else?


Front                                         Back

Please read more on my blog.

A darling little newspaper pattern

My pen pal, Amanda from Adelaide, has sent me a bunch of her vintage patterns to try out before she gives them a go (she's getting married, and is way too busy to try them at the moment) and here's one that's a little bit curly but I think I got it right after a few goes:


The pattern is numbered 8168, and came in a envelope labeled (as you can see above) with the town's two local papers. Now I'm not from Adelaide, but I think the Advertiser is still the main paper, but I don't think the Chronicle is around anymore. I've never really heard of newspapers doing a 'Pattern Service' before, but how wonderful that they did! I really liked the shape of the bodice in this pattern, so took it slow and steady for my first attempt, following the instructions down to a T:

I used fabric from my stash, hence the purple band for the waist, as the stripey stuff was only just enough for the bodice and the skirt. But, I can't really see the drawing above in this real life garment? The shoulders are way too thick, and there are sleeves (those kinda forties sleeves) so maybe I didn't fold them under enough to get that scoopy shoulder/arm line? I outlined this dress in more details over at my Crafty Adventures blog.

Nevertheless, it's still cute and kinda more 80s vintage looking that maybe 1960s as the pattern describes perhaps?

Here's my next attempt:


It's shorter and resized to fit me! (More details on my blog about my resizing) And how crazy is the fabric! As always, dear Sew Retro friends, I've used all stash fabrics, but they're all from thriftiness shopping as I only buy second hand fabrics. Even the side zippers are op shopped!

Thanks for such great posts too guys, I've been reading a lot instead of making as we're relocating interstate, so sadly I'll be packing up my sewing room soon! Yay for sewing and love your vintage styles!

xoxo

Vintage Necktie Purse

In my spare time I when I'm not processing orders for my company: 
I  altered a graduation robe for my son for Halloween.  He wants to be Darth Sidious- add a hood to a graduation robe - one Sith costume to go :) 
For the holiday fair for my son's school I am sewing purses from vintage ties. 


Inside view 

I have to make about 25 of them for the fair.  They are pretty quick to make. (about an hour). I got the ties from tag sales over the summer and added vintage buttons.   I have a giant box of ties sorted by color.  The challenge is come up with something that isn't completely hideous, and that a pre-teen might like.  It uses half of a tie for the purse.  I use one of the spare tie halves for the shoulder strap.  I think it looks cute with jeans!

To make this purse you need a minimum of 3 ties.  I either use the narrow end pieces from other ties, or the narrow ends of the tie to fill make it a little wider.  One half tie is used for the shoulder strap. I use a wide zig zag stitch to join them and slightly overlap them when I'm sewing them.  You can sew them with invisible thread or a complementary thread color.
Vintage ties tend to sell for $.50 - $2 depending on what your thrift store wants to sell them for.  I bought a GIANT box lot of them on ebay for this project.  Better yet, ask your Dad, Husband, and Grandpa for their old ties.  

I'm created an etsy page to sell them.